
 I'm usually not one for sappy stuff but I just couldn't help myself when I found this translucent cherry red record. I made the cutest heart shaped pendant with it. It's dripping with sticky sweetness and I love it! The red color is super vibrant. I polished the silver behind the vinyl to a high-shine to help reflect any light hitting the back of the necklace. After all, if I'm going to do the lovey-dovey thing, I'm going all out. It's posted up in my Etsy shop now, and was featured on Modish last week!
2/09/2008
New necklace design-Vinyl heart necklace
I'm usually not one for sappy stuff but I just couldn't help myself when I found this translucent cherry red record. I made the cutest heart shaped pendant with it. It's dripping with sticky sweetness and I love it! The red color is super vibrant. I polished the silver behind the vinyl to a high-shine to help reflect any light hitting the back of the necklace. After all, if I'm going to do the lovey-dovey thing, I'm going all out. It's posted up in my Etsy shop now, and was featured on Modish last week!
1/19/2008
Quick update!
Ahh...happy January! I'm sad to admit that between a cold, then a sinus infection, and general winter blahs I'm having less than a stellar beginning to 2008. I am finding it difficult to muster the motivation for posting as well as creating! I did manage to pump out a bit of work for AVC, some of which are brand new designs. So, I have a few new necklace designs and a couple of new designers to share!
Nature vs Machine was also recently featured on its first blog! I like that I was recognized both for my art and the fact that a portion of my art is recycled. Unfortunately, metal work does not typically lend itself to "green art" because harsh chemicals are involved in production. I've not heard much along the lines of eco-friendly polishing compounds but if they exist, I will find them!
I hope 2008 finds you all happy and healthy! I will return with fun updates soon!
12/04/2007
Art vs Craft: This weekend!
I have been hard at work the past few weeks preparing for this round of Art vs Craft. Definitely come out to support your local artists if you live in the area. The venue this year is beautiful and there are going to be many talented designers to buy gifts from, since I'm sure you've all signed the "Buy handmade" pledge!
11/23/2007
Crafting with cardboard
I'm a pretty big Star Wars fan. I'm also a pretty frequent "crafter". I find myself using cardboard, white glue, and hot glue in many of my projects. With that in mind, you can imagine how blown away I was when I stumbled across this tutorial on how to construct your own Boba Fett helmet out of cardboard!
This "crafter" takes cardboard construction into a whole other realm in this tutorial. Even though I've used similar methods to construct items of my own (check out my crown!), I had no idea cardboard could be so versatile and could be used in the creation of such complex shapes! I am inspired to utilize some of his tips and tricks in future designs. After seeing his technique, I feel anything can be created with cardboard and glue if you have plenty of patience and a sharp X-Acto blade!

This "crafter" takes cardboard construction into a whole other realm in this tutorial. Even though I've used similar methods to construct items of my own (check out my crown!), I had no idea cardboard could be so versatile and could be used in the creation of such complex shapes! I am inspired to utilize some of his tips and tricks in future designs. After seeing his technique, I feel anything can be created with cardboard and glue if you have plenty of patience and a sharp X-Acto blade!

The unfinished helmet
11/09/2007
Drooling over new tools
 I reluctantly went to Home Depot last night to pick up a few necessary items. (I much prefer to spend my money at a locally owned establishment but they close so early!) I needed rubber cement and carborundum paper-which I never found. What I did find was a new abrasive wheel for my Dremel that I later found gives silver a nice satin finish. I also looked for and found the newest Dremel Workstation. As soon as my eyes settled on the box I swooped down and picked it up. I cradled it in my arms as though it were a newborn kitten. I'm sure I made a few random high pitched noises and was probably talking to myself while gazing lovingly at the picture on the outside of the box. I want this workstation. Very badly. I also need it.
The workstation grips the Dremel motor in a vice to allow the user to wield the Dremel like a drill press. Thus far, I've proven to be pretty incapable of holding my Dremel perpendicular to my work. Though it seems relatively easy to drill straight downward, somehow my holes always end up angled-which becomes a problem when I rivet. Another attractive feature of the workstation: The vice that holds the Dremel can be tilted up to a full 90° which will allow me to use the Dremel hands-free for polishing and sanding!
A few observations leave me wondering how long this tool will last. It appears to be made entirely from plastic-which is awful! I really hate the throw-away mentality of companies and consumers today. I'd much rather pay extra for a solid piece of equipment. I have read reviews and my fears are confirmed. It is not the most stable piece of equipment-but it is stable enough for my needs, and it can be permanently secured to a workbench if extra stability is needed. It sells for about $45 in most places so it's not too expensive. I hope to pick one up soon-hopefully during an after Christmas sale!
11/06/2007
Crafting for Halloween
 Wow! I can't believe I've been M.I.A. for two weeks! Between Halloween, the recent time change, and the chilliness of autumn, I just can't seem to get motivated. I hope this is a temporary setback-my art show isn't getting any farther away! In my defense, I did spend a week and a half solid constructing my Halloween costume. Since that definitely fits into the "crafting" category, (do I have one of those?) here's what I accomplished, with the help of Mario and Luigi, of course. I present: Mario-Kart Princess Peach! The photo was taken with a cell phone so it is a bit grainy, but you can get the gist of the costume. It included a Kart, a pink ball gown, a bejeweled crown, and various props, such as stars (for an extra boost of energy and invincibility) and turtle shells (for knocking down the competition).
The cart was made from 1.5" foam insulation which we glued together using some industrial adhesive and dowels. The pieces of foam were all sanded down, glued together, and spray painted with a special latex paint that doesn't dissolve plastics/foam/etc.
I made the dress by making a pattern from another ball gown I happened to own already. You can't see the whole thing, but there's a 1' wide magenta stripe at the bottom and a huge magenta sash around the waist that ties in the back. The skirt poofed out about a foot from my body in all directions, which was great for "watching my step"; let's just say, I tripped more than once. It was labor intensive to make and caused me way more stress than I'd like to admit. The easiest part of the costume was the crown, which I made by gluing two pieces of poster board together with Elmer's glue and securing with a rubber band until dry and as solid as a rock. I spray painted it with gold spray paint, hot glued jewels onto it, punched a few holes at the bottom edge, and bobby pinned it to my wig.
Since Peach hasn't had much of a make over in the past few decades, I updated her look for personal reasons. Gone is the Farrah Fawcett feathered mullet hair and high-necked poufy sleeved princess dress. I'm sure only die-hard fans would even have noticed of the changes I wrought. I thought it was much needed and it suited my style a lot better.
Creating your own Halloween costume is a great way to be creative and original for one of the best holidays of the year. Depending on your costume, it's also an excellent way to recycle and to support your local thrift stores.
10/18/2007
New pendant: Sterling and vinyl lotus
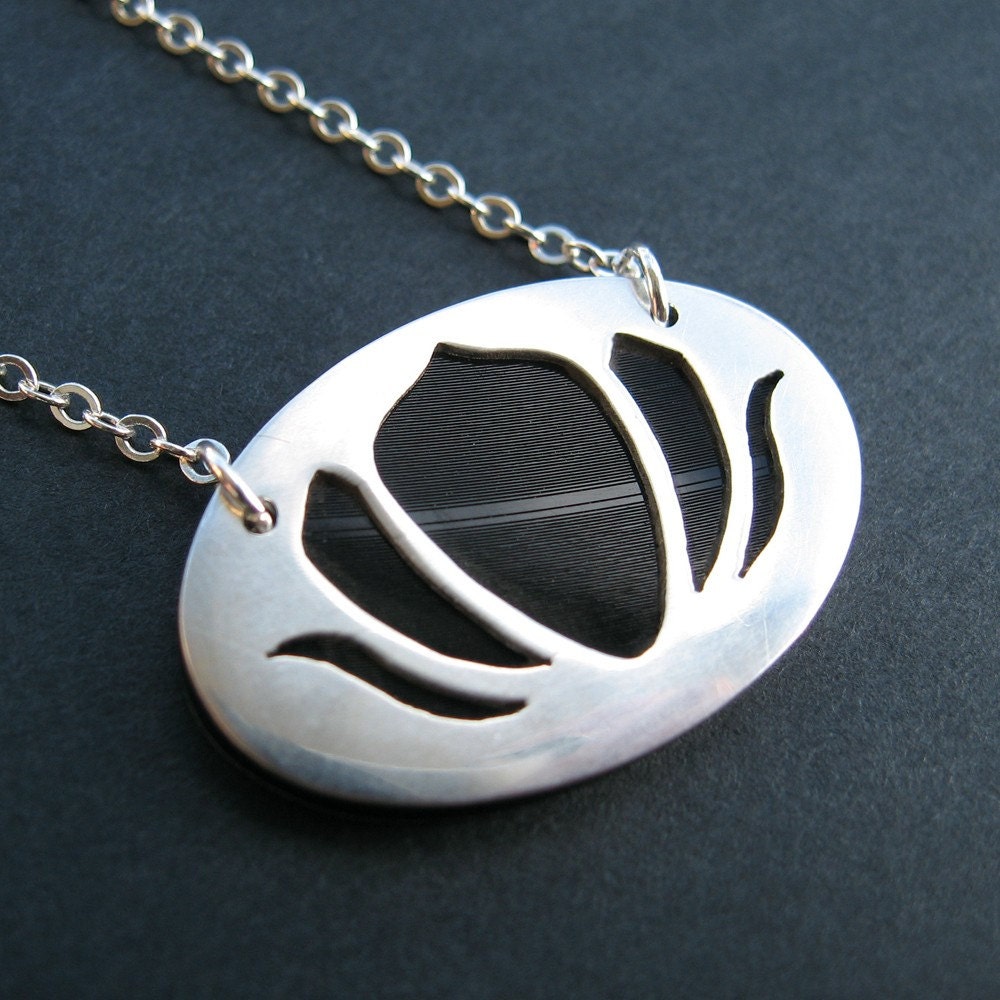 Here's the new custom piece I just finished last week! I riveted hand pierced sterling silver sheets to vintage vinyl. There was a lot of precision cutting to do on this piece and I was skeptical that I would be able to recrate the vision I had for the design. I usually don't try to pierce areas that are too small for my file to fit into, but this particular design demanded it. I utilized my saw blade as a make-shift file and it worked really well to clean up those small areas. In the end, it turned out a lot nicer than I imagined it would. I hope the recipient loves it as much as I do!
10/10/2007
Craft-Boom: A blog dedicated to small business
Lisa of U-Handbag (and U-Handblog) has been working on a fairly new blog called Craft-Boom that is devoted to helping people start and promote a small business. I was reading it today and stumbled upon a very informative tutorial on how to take professional looking photographs of your projects.
Taking great pictures is essential, and something I feel everyone can accomplish with a little practice. Of course, not everyone has the ability to artistically express themselves through photography but that isn't always necessary. What is necessary is clear photos where the background doesn't compete with the subject. White backgrounds tend to drown out silver so I prefer to use dark backgrounds when photographing my jewelry. I do use white backgrounds for photographing my handbags. I use a similar technique to Lisa's for my white background photos but i do see a few differences in her technique that might help speed up the process for me. I found an amendment to steps 2 and 3 in the comments section that explains, in greater detail, how to whiten the background of your photo.
Lisa blogs on everything from how to sew a clutch to effectively marketing your business.
9/26/2007
Etsy Pick: Soku

Soku has been an Etsy favorite of mine for quite awhile. I think a lot of their designs are fresh and unique (and sometimes a little traditional). With this design Soku manages to embody the delicate aesthetic of wire with hardwood. Anyone who is familiar with my style knows earrings like these are right up my alley. In fact, this is the very design that made me check out Soku's shop in the first place.

I also really like the juxtaposition of materials in this acrylic and wood design. It is put together using acrylic rods as rivets. Being someone who uses rivets often, I can appreciate the precision needed for this type of construction. You can find both of these pieces and other Soku designs in Soku's Etsy shop.
9/25/2007
Art vs Craft!
My friend and I got our Art vs Craft acceptance email last week! I am excited about being accepted but I am kind of freaked out. I know how much work goes into art fairs and it scares me a little. I think I put too much off until the last minute the last time around and it caused me a lot of stress. I hope I can learn from my past experience and get motivated to accomplish as much as possible early on so I don't have a hundred lose ends in December.
When: Dec 8th 10am-7pm
Where: Humphrey Scottish Rite Masonic Center (click for a map)
790 N Van Buren St Milwaukee, WI
When: Dec 8th 10am-7pm
Where: Humphrey Scottish Rite Masonic Center (click for a map)
790 N Van Buren St Milwaukee, WI
Subscribe to:
Comments (Atom)

